Table of contents [Show]
- 1. Starting a New Vue Project
- 2. Vue.js Project Structure Overview
- 3. The public/ Folder
- 4. The src/ Folder — The Heart of Your App
- 5. index.html — The Main HTML Template
- 6. package.json — Project Metadata
- 7. vite.config.js — Build Configuration
- 8. Real-World Example: Organized Vue Project
- 9. Integrating Everything Together
- 10. Pro Tips for Beginners
1. Starting a New Vue Project
Before understanding the structure, let’s create a new Vue project using Vite (recommended for Vue 3) or the Vue CLI.
1.1 Create a Vue project with Vite
# Step 1: Create a new project
npm create vite@latest my-vue-app --template vue

# Step 2: Move into project directory
cd my-vue-app

# Step 3: Install dependencies
npm install

# Step 4: Run the development server
npm run dev
This will spin up a local server and you can see your Vue app at http://localhost:5173.
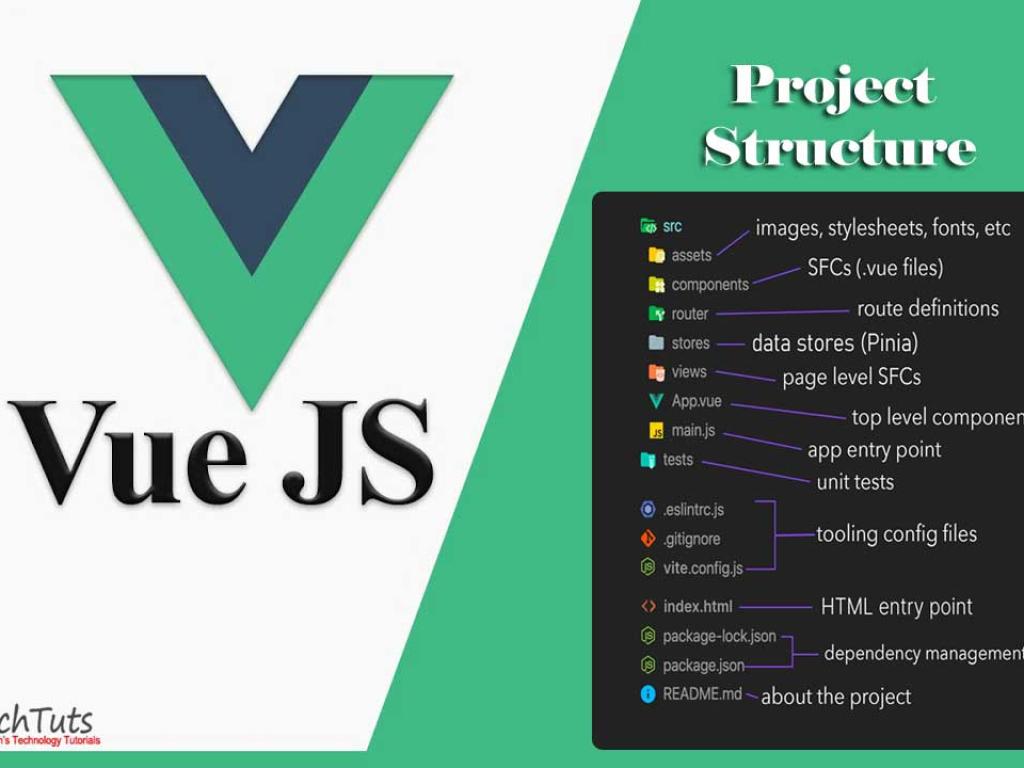
2. Vue.js Project Structure Overview
Here’s how your project folder looks like (using Vite):
my-vue-app/
├─ node_modules/
├─ public/
│  └─ favicon.ico
├─ src/
│  ├─ assets/
│  ├─ components/
│  ├─ App.vue
│  ├─ main.js
│  └─ style.css
├─ index.html
├─ package.json
├─ vite.config.js
└─ README.md
Each of these files and folders serves a specific purpose. Let’s explore them one by one.
3. The public/ Folder
The public folder contains static files that are not processed by Vue or Vite. Anything you put here will be copied directly to your final build output.
For example, if you have a file public/robots.txt, it will be accessible at https://your-site.com/robots.txt.
Example:
public/
  ├─ favicon.ico
  ├─ robots.txt
  └─ logo.png
Use this folder for static assets that do not change — like favicons, verification files, or meta-related icons.
4. The src/ Folder — The Heart of Your App
This is where you spend most of your time developing your Vue application. Let’s break it down.
4.1 main.js — App Entry Point
This is the starting point where Vue initializes the app and mounts it to the DOM.
// src/main.js
import { createApp } from 'vue'
import App from './App.vue'
import './style.css'

createApp(App).mount('#app')
It imports your main component (App.vue) and attaches it to an HTML element with the id app found in index.html.
4.2 App.vue — The Root Component
The App.vue file is your top-level component — everything else nests inside it. Think of it as the root of your Vue component tree.
<template>
  <div id="app">
    <h1>Welcome to My Vue App</h1>
    <HelloWorld />
  </div>
</template>

<script>
import HelloWorld from './components/HelloWorld.vue'

export default {
  components: {
    HelloWorld
  }
}
</script>

<style>
#app {
  text-align: center;
  color: #42b983;
}
</style>
This file contains three main sections: <template> (HTML), <script> (JavaScript/logic), and <style> (CSS).
4.3 components/ Folder
This is where you put reusable Vue components like buttons, cards, and widgets. Each component has its own file, usually ending in .vue.
src/
├─ components/
│  ├─ HelloWorld.vue
│  ├─ Navbar.vue
│  └─ TodoItem.vue
Example component:
<template>
  <button @click="count++">
    You clicked {{ count }} times.
  </button>
</template>

<script setup>
import { ref } from 'vue'
const count = ref(0)
</script>
This simple component demonstrates the Composition API with ref().
4.4 assets/ Folder
Use this folder for images, icons, or other static assets referenced inside components.
<template>
  <img src="@/assets/logo.png" alt="Logo" />
</template>
Assets imported in src/ are processed by Vite, meaning they’ll be optimized, hashed, and served efficiently.
5. index.html — The Main HTML Template
Unlike traditional web apps, Vue uses a single HTML file as an entry point. All your Vue components eventually render inside it.
<!DOCTYPE html>
<html lang="en">
  <head>
    <meta charset="UTF-8" />
    <meta name="viewport" content="width=device-width, initial-scale=1.0" />
    <title>My Vue App</title>
  </head>
  <body>
    <div id="app"></div>
    <script type="module" src="/src/main.js"></script>
  </body>
</html>
Notice that it includes <div id="app"></div>. That’s where your Vue app mounts.
This file defines dependencies, scripts, and metadata for your Vue app. Think of it as the brain of your project setup.
{
  "name": "my-vue-app",
  "version": "1.0.0",
  "scripts": {
    "dev": "vite",
    "build": "vite build",
    "preview": "vite preview"
  },
  "dependencies": {
    "vue": "^3.4.0"
  },
  "devDependencies": {
    "vite": "^5.0.0"
  }
}
Use npm run dev for development and npm run build for production builds.
7. vite.config.js — Build Configuration
This file customizes your build setup, like aliases, plugins, or base URLs. Example:
// vite.config.js
import { defineConfig } from 'vite'
import vue from '@vitejs/plugin-vue'

export default defineConfig({
  plugins: [vue()],
  resolve: {
    alias: {
      '@': '/src'
    }
  },
  base: '/'
})
This alias (@) makes importing files easier and cleaner throughout your app.
8. Real-World Example: Organized Vue Project
Below is a more realistic structure of a medium-size Vue app:
src/
├─ assets/
│  ├─ images/
│  ├─ styles/
│  └─ icons/
├─ components/
│  ├─ Navbar.vue
│  ├─ Footer.vue
│  └─ TodoItem.vue
├─ views/
│  ├─ HomeView.vue
│  ├─ AboutView.vue
│  └─ LoginView.vue
├─ router/
│  └─ index.js
├─ store/
│  └─ index.js
├─ utils/
│  └─ helpers.js
├─ App.vue
└─ main.js
8.1 views/ Folder
This folder stores “pages” or route-level components. These are rendered based on the URL path.
// src/views/HomeView.vue
<template>
  <div>
    <h2>Home Page</h2>
    <TodoList />
  </div>
</template>

<script setup>
import TodoList from '@/components/TodoList.vue'
</script>
8.2 router/index.js
The Vue Router file defines how different URLs map to different views.
// src/router/index.js
import { createRouter, createWebHistory } from 'vue-router'
import HomeView from '../views/HomeView.vue'
import AboutView from '../views/AboutView.vue'

const routes = [
  { path: '/', component: HomeView },
  { path: '/about', component: AboutView }
]

const router = createRouter({
  history: createWebHistory(),
  routes
})

export default router
8.3 store/ Folder
If your app uses state management (like Vuex or Pinia), this is where you store global app state.
// src/store/index.js (Vuex example)
import { createStore } from 'vuex'

export default createStore({
  state: { count: 0 },
  mutations: {
    increment(state) {
      state.count++
    }
  }
})
Pinia (the new official store) is even simpler to use in Vue 3.
Now let’s see a full minimal real-world example that combines components, views, and router.
// src/main.js
import { createApp } from 'vue'
import App from './App.vue'
import router from './router'
import './assets/styles/global.css'

createApp(App)
  .use(router)
  .mount('#app')
// src/App.vue
<template>
  <div>
    <Navbar />
    <router-view />
    <Footer />
  </div>
</template>

<script setup>
import Navbar from '@/components/Navbar.vue'
import Footer from '@/components/Footer.vue'
</script>
This structure makes your app scalable, clean, and easy to maintain as it grows.
10. Pro Tips for Beginners
- Use consistent naming: Always capitalize component names like
MyButton.vue. - Organize by feature: In larger apps, group files by feature, not type (e.g.,
/todowith all related files inside). - Keep components small: Each component should ideally do one thing well.
- Use aliases (@): It makes imports shorter and less error-prone.
- Version control: Always commit the core structure early so you can track changes.


