Table of contents [Show]
Introduction
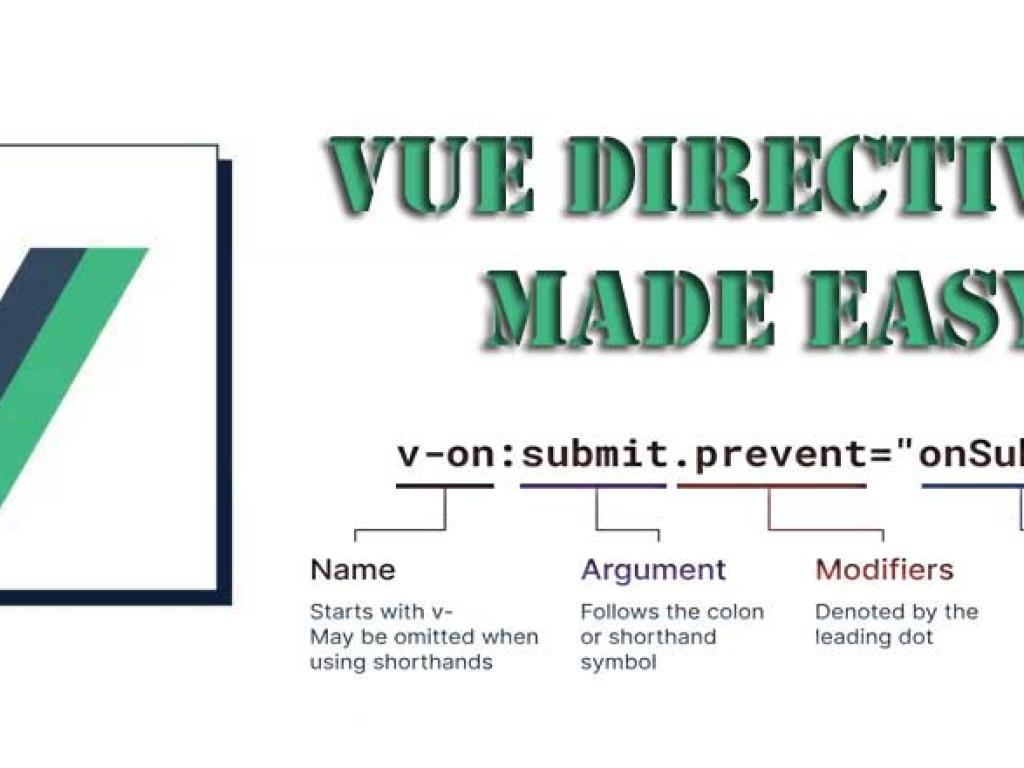
Vue.js is one of the most popular frontend frameworks today, known for its simplicity, versatility, and approachable learning curve. At the heart of Vue’s power lie its directives. Directives are special tokens in Vue templates that tell the framework to do something with the DOM. They look like HTML attributes but come with extra reactive power.
In this article, we’ll dive deep into four of the most frequently used Vue directives:
v-bind– for binding attributes dynamicallyv-if– for conditional renderingv-for– for rendering listsv-show– for toggling visibility efficiently
By the end, you’ll have a clear understanding of how these directives work, when to use each, and how to apply them effectively in real-world projects.
Getting Started with Vue Directives
Before diving into each directive, let’s quickly set up a Vue environment. You can either use Vue via a CDN link or set up a project with Vue CLI. For simplicity, we’ll start with the CDN version so you can follow along in any HTML file.
<!DOCTYPE html>
<html lang="en">
<head>
  <meta charset="UTF-8">
  <title>Vue Directives Example</title>
  <script src="https://unpkg.com/vue@3/dist/vue.global.js"></script>
</head>
<body>
  <div id="app">
    <!-- Vue content will go here -->
  </div>

  <script>
    const { createApp } = Vue;
    createApp({
      data() {
        return {
          message: "Hello Vue!"
        }
      }
    }).mount('#app')
  </script>
</body>
</html>
With this setup, we’re ready to explore the directives.
Understanding v-bind
What is v-bind?
The v-bind directive is used to dynamically bind values to HTML attributes. Without v-bind, you’d be stuck with static values. With it, you can make attributes reactive and automatically update when data changes.
Basic Example
<div id="app">
  <a v-bind:href="url">Visit Site</a>
</div>

<script>
  createApp({
    data() {
      return {
        url: "https://vuejs.org"
      }
    }
  }).mount('#app')
</script>
Here, v-bind:href="url" ensures that the link always points to the current value of url. If url changes, the href updates automatically.
Shorthand Syntax
Vue allows shorthand syntax for v-bind. Instead of writing v-bind:href, you can simply write :href.
<a :href="url">Visit Site</a>Binding Multiple Attributes
Sometimes, you want to bind multiple attributes at once. Vue lets you do this by passing an object.
<div v-bind="{ id: dynamicId, class: dynamicClass }">Dynamic Div</div>Whenever dynamicId or dynamicClass changes, the attributes update instantly.
Use Case: Dynamic Images
<img :src="imageSrc" :alt="imageAlt">This is perfect for image galleries or CMS-driven websites where image paths and alt texts change dynamically.
Working with v-if
What is v-if?
The v-if directive conditionally renders elements in the DOM. If the condition evaluates to true, the element is rendered; if false, the element is completely removed.
Basic Example
<div id="app">
  <p v-if="isLoggedIn">Welcome back!</p>
  <p v-else>Please log in.</p>
</div>

<script>
  createApp({
    data() {
      return {
        isLoggedIn: false
      }
    }
  }).mount('#app')
</script>
Here, if isLoggedIn is false, Vue renders Please log in. Otherwise, it shows Welcome back!
Using v-else-if
You can chain conditions using v-else-if.
<p v-if="score >= 90">Grade: A</p>
<p v-else-if="score >= 75">Grade: B</p>
<p v-else>Grade: C</p>
Performance Note
Since v-if adds/removes elements from the DOM, it can be expensive if toggled frequently. In such cases, v-show might be more efficient.
Exploring v-for
What is v-for?
The v-for directive is used to render a list of items based on an array or object. It’s one of the most powerful and commonly used directives in Vue.
Rendering Lists
<ul>
  <li v-for="item in items" :key="item.id">
    {{ item.name }}
  </li>
</ul>

<script>
  createApp({
    data() {
      return {
        items: [
          { id: 1, name: "Apples" },
          { id: 2, name: "Oranges" },
          { id: 3, name: "Bananas" }
        ]
      }
    }
  }).mount('#app')
</script>
Index in v-for
<li v-for="(item, index) in items" :key="index">
  {{ index }} - {{ item }}
</li><div v-for="(value, key) in user" :key="key">
{{ key }}: {{ value }}
</div>
<script>
createApp({
data() {
return {
user: { name: "Alice", age: 25, country: "Canada" }
}
}
}).mount('#app')
</script>
HTML Table Example
Rendering tables with v-for is very common. Let’s see an example:
<table border="1">
  <tr>
    <th>ID</th>
    <th>Name</th>
  </tr>
  <tr v-for="item in items" :key="item.id">
    <td>{{ item.id }}</td>
    <td>{{ item.name }}</td>
  </tr>
</table>
Learning v-show
What is v-show?
The v-show directive toggles the visibility of an element using CSS display. Unlike v-if, it doesn’t remove the element from the DOM.
Basic Example
<div id="app">
  <p v-show="isVisible">Now you see me!</p>
</div>

<script>
  createApp({
    data() {
      return {
        isVisible: true
      }
    }
  }).mount('#app')
</script>
When isVisible is false, the paragraph is hidden but still present in the DOM.
When to Use v-show vs v-if
| Directive | Behavior | Use Case |
|---|---|---|
| v-if | Adds/removes element from DOM | Rarely toggled elements (e.g., login forms) |
| v-show | Uses CSS display toggle | Frequently toggled elements (e.g., dropdowns, tabs) |
Combining Directives for Power
The real power of Vue directives comes when you combine them. For example, rendering a list with conditional visibility and dynamic binding:
<ul>
  <li v-for="item in items" :key="item.id" v-show="item.available">
    <a :href="item.link">{{ item.name }}</a>
  </li>
</ul>
Here, we used v-for to render a list, v-bind for dynamic links, and v-show to conditionally display available items.
Step-by-Step Mini Project
Let’s tie everything together by building a small Vue app: a product list with availability and dynamic details.
<div id="app">
  <h2>Product List</h2>
  <table border="1">
    <tr>
      <th>ID</th>
      <th>Name</th>
      <th>Price</th>
      <th>Available</th>
    </tr>
    <tr v-for="product in products" :key="product.id" v-show="product.available">
      <td>{{ product.id }}</td>
      <td><a :href="product.link">{{ product.name }}</a></td>
      <td>${{ product.price }}</td>
      <td><span v-if="product.available">Yes</span><span v-else>No</span></td>
    </tr>
  </table>
</div>

<script>
  createApp({
    data() {
      return {
        products: [
          { id: 1, name: "Laptop", price: 1200, available: true, link: "#laptop" },
          { id: 2, name: "Phone", price: 800, available: false, link: "#phone" },
          { id: 3, name: "Tablet", price: 600, available: true, link: "#tablet" }
        ]
      }
    }
  }).mount('#app')
</script>
This small project showcases v-bind, v-if, v-for, and v-show in action together. It’s a great example of how directives simplify building reactive UIs.
Conclusion
Vue directives are essential tools for building interactive, data-driven applications. Here’s a quick recap:
- v-bind – Dynamically bind attributes
- v-if – Render elements conditionally
- v-for – Render lists efficiently
- v-show – Toggle visibility with CSS
With these directives mastered, you’re well on your way to becoming proficient with Vue.js. Keep experimenting, combine directives creatively, and you’ll see how easily Vue helps you create powerful and dynamic web applications.


