Table of contents [Show]
- Introduction: Why Slots Matter in Vue
- What are Vue Slots?
- Getting Started with Default Slots
- Fallback Content in Slots
- Named Slots: Distributing Multiple Content Areas
- Scoped Slots: Passing Data from Child to Parent
- Best Practices for Using Vue Slots
- Advanced Example: Reusable Data Table with Scoped Slots
- Conclusion: Unlocking the Power of Vue Slots
Introduction: Why Slots Matter in Vue
Every developer who has worked with Vue knows the magic of reusable components. But what makes them truly flexible is the ability to decide what content goes inside those components. That’s where Vue slots come in. Slots let you inject dynamic content into a component while still keeping the component reusable and maintainable.
When I first discovered slots, it felt like a secret weapon. I no longer had to duplicate components for small variations. Instead, I could build one reusable “shell” and pass different content into it. Think of it like designing a shopping mall: the structure is the same, but each store inside has its own unique layout. Slots give you that level of flexibility in Vue.
What are Vue Slots?
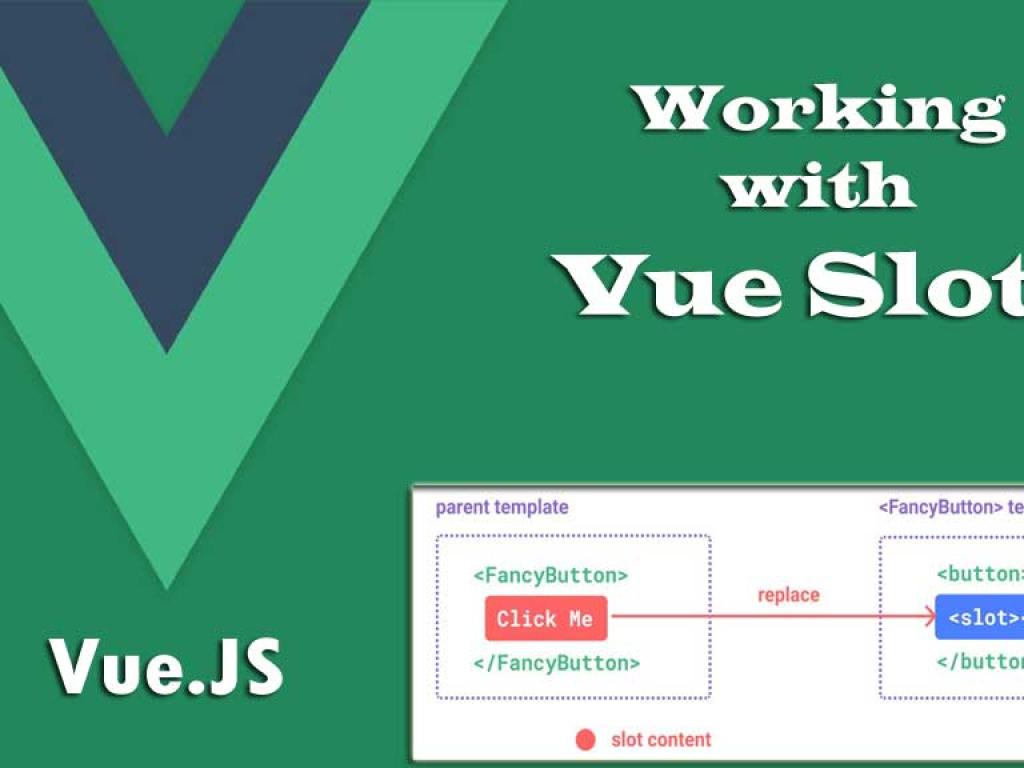
A slot is essentially a placeholder inside a Vue component template that allows the parent to inject its own content. Slots make your components adaptable to different use cases without modifying the component itself.
Basic Analogy
Imagine a picture frame. The frame (component) provides structure and style, but the actual photo inside (slot content) is provided by the user. The frame can be reused with different photos, and each photo still looks great inside it. That’s exactly what Vue slots do for your components.
Getting Started with Default Slots
The simplest slot in Vue is the default slot. It allows a parent component to pass any content to the child component.
Example: Card Component with Default Slot
<!-- Card.vue -->
<template>
 <div >
  <slot>This is fallback content</slot>
 </div>
</template>

<script>
export default {
 name: 'Card'
}
</script>

<style>
.card {
 border: 1px solid #ccc;
 padding: 16px;
 border-radius: 8px;
}
</style>
Using the Card Component
<template>
  <div>
    <Card>
      <h2>Hello World</h2>
      <p>This is some card content.</p>
    </Card>

    <Card>
      <p>Another card with different content.</p>
    </Card>
  </div>
</template>

<script>
import Card from './Card.vue';

export default {
  components: { Card }
}
</script>
Result: Both cards share the same border and styling, but the content inside them differs. This shows how slots help with content distribution in Vue.
Fallback Content in Slots
Slots can have fallback (default) content that renders when no content is provided by the parent. In the Card example above, “This is fallback content” will appear if no child content is passed.
This is extremely useful for providing sensible defaults while keeping your components flexible.
Named Slots: Distributing Multiple Content Areas
Sometimes, one placeholder isn’t enough. You may want to distribute content into multiple sections—like a card with a header, body, and footer. That’s where named slots shine.
Example: Card Component with Named Slots
<!-- Card.vue -->
<template>
 <div >
  <header >
   <slot name="header">Default Header</slot>
  </header>
  <main >
   <slot>Default Body</slot>
  </main>
  <footer >
   <slot name="footer">Default Footer</slot>
  </footer>
 </div>
</template>
Using Named Slots
<Card>
  <template v-slot:header>
    <h2>Custom Card Header</h2>
  </template>

  <p>This is the main card body.</p>

  <template v-slot:footer>
    <button>Action</button>
  </template>
</Card>
Result: Each slot area (header, body, footer) receives its own content, making the component more customizable without duplication.
Scoped Slots: Passing Data from Child to Parent
Scoped slots are like supercharged slots. They let child components pass data back up to the parent, which can then decide how to render it. This makes scoped slots incredibly useful for dynamic layouts, tables, and lists.
Example: List Component with Scoped Slot
<!-- ItemList.vue -->
<template>
  <ul>
    <li v-for="item in items" :key="item.id">
      <slot :item="item">{{ item.name }}</slot>
    </li>
  </ul>
</template>

<script>
export default {
  name: 'ItemList',
  props: ['items']
}
</script>
Using the Scoped Slot
<ItemList :items="users">
  <template v-slot:default="{ item }">
    <strong>{{ item.name }}</strong> - {{ item.email }}
  </template>
</ItemList>

<script>
import ItemList from './ItemList.vue';

export default {
  components: { ItemList },
  data() {
    return {
      users: [
        { id: 1, name: 'Alice', email: 'alice@example.com' },
        { id: 2, name: 'Bob', email: 'bob@example.com' }
      ]
    }
  }
}
</script>
Result: The parent decides how each list item is rendered, while the child provides the data. This decoupling of data and presentation is a game-changer for building flexible components.
Best Practices for Using Vue Slots
- Keep components flexible: Use slots for customizable content areas instead of hardcoding.
- Use fallback content wisely: Always provide defaults to prevent broken layouts.
- Name your slots descriptively:
header,body,footerare clearer thanslot1,slot2. - Scoped slots for data: Pass only the data the parent needs, keeping the API clean.
Advanced Example: Reusable Data Table with Scoped Slots
Let’s build a reusable table component that displays dynamic data but lets the parent decide how each cell is rendered.
DataTable.vue
<template>
  <table border="1" cellpadding="6">
    <thead>
      <tr>
        <th v-for="col in columns" :key="col">{{ col }}</th>
      </tr>
    </thead>
    <tbody>
      <tr v-for="row in data" :key="row.id">
        <td v-for="col in columns" :key="col">
          <slot name="cell" :row="row" :col="col">
            {{ row[col] }}
          </slot>
        </td>
      </tr>
    </tbody>
  </table>
</template>

<script>
export default {
  name: 'DataTable',
  props: {
    columns: Array,
    data: Array
  }
}
</script>
Using DataTable.vue
<DataTable :columns="['id','name','email']" :data="users">
  <template v-slot:cell="{ row, col }">
    <span v-if="col === 'email'">
      <a :href="`mailto:${row[col]}`">{{ row[col] }}</a>
    </span>
    <span v-else>{{ row[col] }}</span>
  </template>
</DataTable>
Result: The parent customizes how emails are rendered as clickable links, while the DataTable handles the structure and layout.
Conclusion: Unlocking the Power of Vue Slots
We’ve journeyed through the world of Vue slots—from simple default slots to powerful scoped slots. Along the way, we saw how slots enable flexible content distribution, reusable components, and clean separation of concerns. Whether you’re building cards, modals, tables, or dashboards, slots are the secret ingredient that makes your Vue components shine.
By mastering slots, you’re not just writing Vue code—you’re designing adaptable, future-proof UI architecture. And trust me, your future self (and your teammates) will thank you for it.


