Microsoft Excel Fill Handle:Make Data Entry Easier
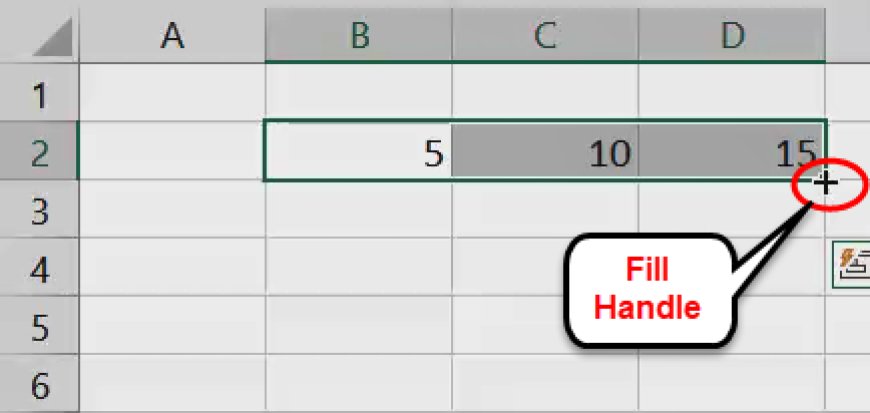
The Fill Handle is a small square at the bottom-right corner of a selected cell or range in Excel. It's a versatile tool that allows you to quickly fill adjacent cells with a series of data, whether it's numbers, dates, text, or a combination of these.

Microsoft Excel is a powerful spreadsheet software that offers countless tools and features to help you manage and analyze data efficiently. One such handy feature is the Fill Handle, which can save you a significant amount of time and effort when working with large datasets.
What is the Fill Handle?
The Fill Handle is a small square at the bottom-right corner of a selected cell or range in Excel. It's a versatile tool that allows you to quickly fill adjacent cells with a series of data, whether it's numbers, dates, text, or a combination of these. By dragging the Fill Handle, Excel automatically extends or repeats the values based on your input, making it an essential tool for tasks like creating sequences, copying formulas, and more.
Using the Fill Handle for Basic Tasks
1. Filling Numbers in Sequence
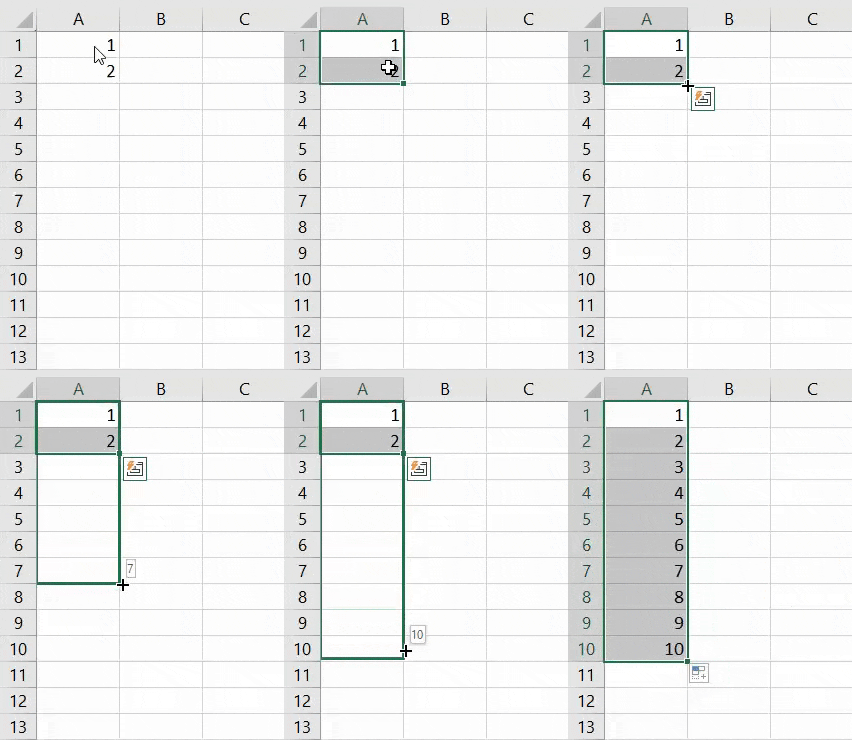
One of the most common uses of the Fill Handle is to generate a sequence of numbers. Here's how you can do it:
- Start by typing the first number in a cell and seond number in subsequent cell (e.g., 1,2).
- Select both cells.
- Hover your mouse cursor over the Fill Handle (bottom-right corner of the selected cell).
- Click and drag the Fill Handle down or to the right to extend the sequence.
For example, if you drag the Fill Handle down, Excel will automatically fill the adjacent cells with an incremental sequence (e.g., 1, 2, 3, 4, and so on). Similarly, dragging it to the right will generate a sequence in the corresponding columns.

2. Filling Dates in Sequence
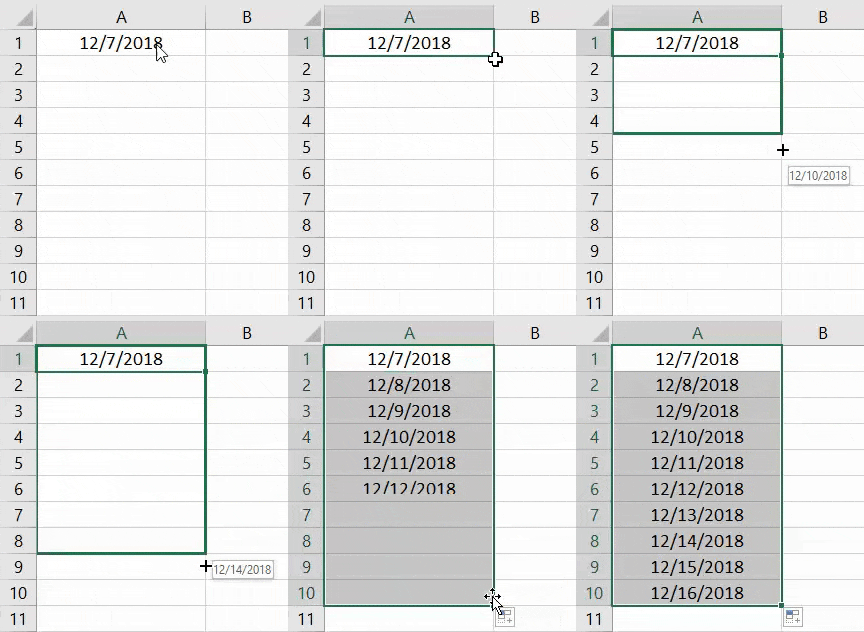
You can also use the Fill Handle to create a sequence of dates. Here's how:
- Enter the first date in a cell.
- Select that cell.
- Drag the Fill Handle in the desired direction to extend the date sequence.
Excel is intelligent enough to recognize the pattern, and it will continue the sequence accordingly. For instance, if you start with January 1, 2023, and drag the Fill Handle downwards, Excel will fill the adjacent cells with sequential dates (e.g., January 2, 2023; January 3, 2023; and so on).

Advanced Fill Handle Techniques
1. Filling with Formulas
The Fill Handle isn't just for numbers and dates; you can also use it to copy formulas efficiently. Here's how to do it:
- Enter a formula in a cell (e.g., =A1*B1).
- Select that cell.
- Hover over the Fill Handle.
- Drag it to the desired range.
Excel will copy the formula to the adjacent cells while adjusting the cell references based on their relative positions. For example, if you dragged the Fill Handle to the cell below, the formula would become =A2*B2, and so on.
2. Custom Series Using the Fill Handle
Excel allows you to create custom series using the Fill Handle. This is handy when you want to repeat a specific pattern or sequence. Here's how:
- Enter the first two values of your custom series in two adjacent cells (e.g., "Monday" and "Tuesday").
- Select both cells.
- Hover over the Fill Handle.
- Drag it to the desired range.
Excel will repeat your custom series according to the pattern you defined. In this example, dragging the Fill Handle will generate "Wednesday," "Thursday," and so on.
3. Filling Weekdays or Months
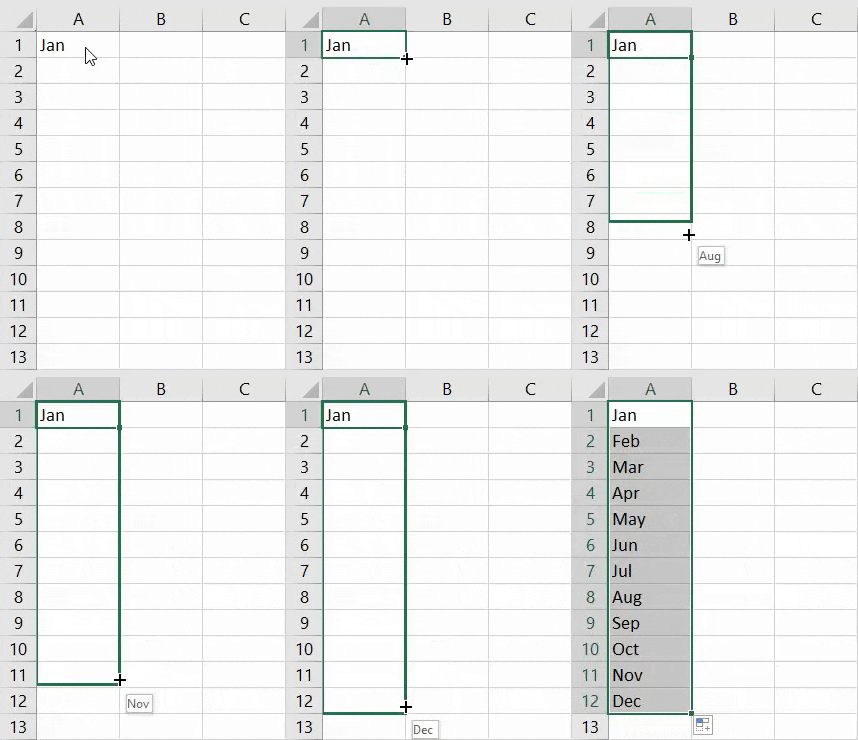
Sometimes, you may need to fill cells with weekdays or months. Excel can do this automatically:
- Type the first weekday or month in a cell (e.g., "Monday" or "January").
- Select the cell.
- Drag the Fill Handle to extend the series.
Excel will continue with the weekdays or months accordingly, making it a breeze to create calendar templates, schedules, or timelines.

Fill Handle Tips and Tricks
Now that you have a good grasp of the basics, let's dive into some tips and tricks to make the most of Excel's Fill Handle:
1. Autofill Options
When you drag the Fill Handle, a small Autofill Options icon appears. Clicking on it gives you control over how Excel fills the cells. You can choose to fill values, formats, or series, depending on your needs.
2. Non-Contiguous Cells
The Fill Handle isn't limited to contiguous cells. You can select multiple non-contiguous cells and drag the Fill Handle to fill them individually, which can be handy for creating complex patterns.
3. Custom Lists
Excel allows you to create custom lists for the Fill Handle to use. To do this:
- Go to "File" > "Options" > "Advanced."
- Scroll down to the "General" section.
- Click on "Edit Custom Lists."
- Enter your custom list items, one per line.
- Click "Add" and then "OK."
Now, when you type the first item from your custom list and drag the Fill Handle, Excel will continue with the list items.
4. Flash Fill
Excel's Flash Fill feature can automatically recognize patterns and fill adjacent cells accordingly. Simply start typing a pattern, and Excel will offer suggestions. Pressing "Enter" will apply the suggestion. While not the same as the Fill Handle, it's a related time-saving tool.
Real-World Examples
Let's explore some practical examples of how to use the Fill Handle in real-world scenarios.
Example 1: Creating a List of Employee Names
Suppose you have a list of employee names, and you want to create a list of email addresses using a standard format, such as firstname.lastname@company.com:
- Enter the first name in cell A1 (e.g., "John").
- Enter the last name in cell B1 (e.g., "Doe").
- In cell C1, combine the first and last names with the desired format:
=A1 & "." & B1 & "@company.com". - Select cell C1.
- Drag the Fill Handle down to fill the rest of the cells with email addresses for the remaining employees.
Excel will automatically update the cell references, ensuring that each email address is unique.
Example 2: Creating a Monthly Expense Report
Suppose you want to create a monthly expense report with dates in column A and corresponding expenses in column B:
- Start by entering the first date in cell A1 (e.g., "01/01/2023").
- In cell B1, enter the first expense (e.g., "$100").
- Select both cells A1 and B1.
- Drag the Fill Handle in column A down to fill the dates for the entire month.
- Drag the Fill Handle in column B to autofill expenses for each date based on a pattern (e.g., increasing by $10 each day).
Excel will generate a complete monthly expense report with dates and expenses calculated accordingly.
Troubleshooting Fill Handle Issues
While the Fill Handle is a powerful tool, you may encounter issues occasionally. Here are some common problems and their solutions:
1. Filling Stops Prematurely
If the Fill Handle stops filling cells unexpectedly, check for hidden rows or columns that might be blocking the sequence. Unhide any hidden rows or columns, and then try again.
2. Incorrect Pattern Recognition
Sometimes, Excel may not recognize the pattern you want to fill. In such cases, consider manually entering a few values to establish the pattern before using the Fill Handle.
3. Fill Handle Not Working
If the Fill Handle doesn't seem to work at all, ensure that the cells you want to fill are not protected or locked. Unprotect the worksheet if necessary.
Conclusion
Excel's Fill Handle is a valuable tool that can save you time and effort when working with data. Whether you need to create sequences, copy formulas, or generate custom series, the Fill Handle is your go-to feature for these tasks. By mastering its various applications and combining it with other Excel features, you can become a more efficient and productive spreadsheet user. So, the next time you're working with Excel, don't forget to put the Fill Handle to good use and watch your productivity soar.

 HSingh